ANIMALS & BIRDS, FLOWERS, FRUITS AND PLANTS
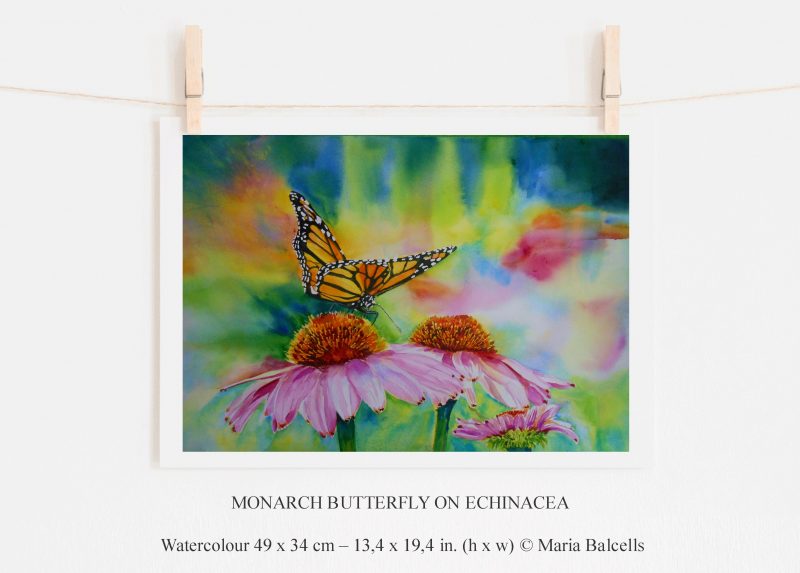
MONARCH BUTTERLY ON ECHINACEA: Watercolour flowers tutorial step by step.
This picture has been painted with a very vibrant background with many colours but soft edges which are balanced with the very hard edges of the butterfly figure. The transition of the colours can be achieved with a varied wash wet on wet or glazing layer of soft edges using a variation of colours. You may choose or another technique to paint it depending on your skills. The flowers in the foreground are easy to paint since they have hard edges. If you use this painting just as inspiration, and you paint a similar picture, remember to unify the background with the foreground.
Let's get started
MATERIALS:
PAPER:
- 300 grams watercolour Cold Pressed paper 35 x 51 cm (13.8“ x 20“)
BRUSHES:
- 55 mm large flat or above to wet the paper.
- No. 12 round.
- No.6 and No. 2 or No. 0 good pointed round.
Colours:
- Lemon Yellow, Winsor Yellow or New Gamboge, Winsor Red, Quinacridone Magenta, Hookers Green, Cerulean Blue, Antwerp Blue, Ultramarine Blue, Indigo and Cobalt Violet:
Other materials:
- Masking fluid
- Saral paper and transparent paper if you are not using a printer.
- Hairdryer
- Tape to fix your paper.
- 2B Pencils and rubber.
- Kitchen paper or toilet paper, both work well as long as they are not dimpled or coloured.
- A small spray bottle with clean water.
STEP 1: DRAWING AND MASKING
- Copy and transfer the drawing onto your watercolour paper.

STEP 2:
-
- Mask the white dots on the butterfly wings and let them dry.
- Wet the entire paper with clean water and then let it dry.
- Wet the paper again and while the paper is still shining to add a light wash of Lemon Yellow to the areas above the flowers, wet on wet, as indicated in the photo below. Add some New Gamboge to the butterfly wings and lower part of the flower petals before the Lemon Yellow has dried. Let it all dry.

STEP 3:
-
- Apply masking fluid to the flower stamens and then let the paper dry.
STEP 4:
-
- Once the masking fluid is dry, wet the sides of the butterfly wings with clean water.
- Now mix New Gamboge and Winsor Red to give a nice dark orange and paint the darker sides of the butterfly wings allowing the colour to flow beyond the profile of the wings.

STEP 5:
-
- Now wet the paper again and apply Cerulean Blue to the areas indicated in the photo below. Let it all dry completely.
STEP 6:
-
- Wet all the paper with clean water except for the butterfly and the flowers.
- Turn the paper upside down and slightly raised from the top to ensure that paint does not run into the butterfly and flowers. Then add four areas of Quinacrinode Magenta to the right of the flower without the butterfly and diagonally upwards toward the right corner, add two further areas to the left of the butterfly flower, wet on wet, as indicated on the photo below.
- While the paper is still wet add some Lemon-Yellow below the butterfly wings, but only if the many water washes has made it become too pale. If the yellow is still strong, then leave it as it is.
- As soon as colour stops running, but with the paper still moist, turn your paper the right way up and paint the flower stamens with Lemon Yellow. Let it dry.
- Again wet the area below the flowers and paint this area, wet on wet, combining Lemon-Yellow and Cerulean Blue. Allow the colours to blend naturally on the paper and do not overwork. Allow all to dry completely.
STEP 7:
-
- Check with the back of your hand that the paper is completely dry. If it still feels cold it means that the paper is not completely dry. It is important to have the paper 100% dry otherwise you will produce muddy colours.
- Prepare in your palette a nice May Green by mixing Hookers Green with Lemon Yellow.
- Repeat as in the previous steps then wet the paper again and apply the May Green, wet on wet, to the areas around the butterfly as indicated in the photo below taking care not to get any hard edges. Allow it to dry.
STEP 8:
In this step, we wet the paper again, but this time only to the area in which we are working, and instead of painting wet on wet with only one colour we are going to paint quickly with many colours, one after the other, and allow their edges to blend into each other.
-
-
Wet the upper two-thirds of the paper and then start applying colour to the areas generally shown in the photo below. Add a little Lemon Yellow beneath the right wing of the butterfly and while still wet add a little orange to it.
-
Immediately clean your brush and add Quinacrinode Magenta light below this and extend it to the upper-right side.
-
Now apply more Lemon Yellow directly below the wing and to the left of the Quinacrinode Magenta and orange and extend this to the right as a short
-
We will now paint the upper-right side corner with four different colours. Start by applying a short vertical stroke of May Green approximately a quarter of the way in from the top-right edge of the paper. Apply Ultramarine Blue immediately to the right of the May Green, followed by Antwerp Blue to the right of Ultramarine Blue. Finally fill in the area between the Antwerp Blue and the edge of the paper with Indigo.
-
Now turn the paper upside down and drop in a minimal amount of Lemon Yellow with a short brush stroke.
-
If you are happy with the result, then allow it to dry. If not, then quickly wash the colour away using a spray bottle with clean water. Once dry you may start again, nothing will be spoilt.
-
Allow it to dry and then turn the paper the right way.
-
STEP 9:
-
- This step is a little tricky. I did it all in one go, but it may be easier for you to do it in two stages. For both stages, you will need to wet all the upper and left side of the paper with clean water.
- Once the paper is wet turn it upside down and elevate it a little at the top
- Brush in the colours along the bottom edge generally as shown in the photo below. You may generate your background if you wish with the suggested colours Ultramarine Blue, Indigo, May Green, Hookers Green and Quinacridone Magenta. You may need to drop in colour again while wet until you get the value that you want. Allow it all to dry.
- Once dry rotate the paper 45 degrees clockwise and paint the left side in the same way but pulling the colours towards the left upper corner a little. Allow the colours to run down but just a little so that they do not cover each other totally, or you could produce muddy colours.
- Before the colours completely dry spatter some Lemon Yellow into them.
- Allow it to dry in this position. Once dry, turn the paper the right way up.
STEP10:
-
- With the No. 0 brush paint some small strokes of orange on the head of the echinacea followed by some stokes of light Winsor Red and then a few more strokes of May Green. Let them dry.
- Paint the petals on the echinacea with a very pale Quinacrinode Magenta.
- Paint the flower stems with a light May Green, add some Ultramarine Blue near to the petals, and then paint the rest with Hookers Green.
- Paint the small leaves on the lower flower with short brush strokes, first with May Green, then Hookers Green and finally fill in the spaces between with Ultramarine Blue.
- Paint the space between the butterfly and the echinacea starting from left to right, first with Ultramarine Blue, then Antwerp Blue, then Hookers Green and finally May Green, so that you get a transition from dark to light.
- Let it all dry again.
STEP 11:
-
- Now apply a second glaze of Quinacrinode Magenta to the flower petals but do not cover the entire petal. Paint a little on each side of the petals. Remember the rule “light against dark and dark against light.” You may add some highlights using Cobalt Violet or Quinacrinode Magenta pure.
- Paint the ends of the petals with a drop of orange and once they are dry add a drop of dark red, made from mixing Winsor Red, Indigo and a small amount of Lemon Yellow, to the tips.
- Add some small strokes of dark red to the flower heads.
- Check the area under the flowers, if the values are too light add a small glaze with Ultramarine Blue and Hookers Green and ensure that you soften the edges with a brush and clean water.
- Now make a nice black by mixing Indigo, Ultramarine Blue, Winsor Red and a small amount of Lemon Yellow then carefully paint the butterfly wings. Let it all dry.
STEP 12:
-
- Remove the masking fluid from the butterfly wings and flower stamens.
- Now paint the antenna and legs on the butterfly with the black colour using the 0 brush.
- When the masking fluid has been removed from the stamens they need to be softened a little. This can be done in two ways:
- Paint over the stamen stems with water allowing the colour on both sides to run into them taking care not to wet the stamen heads, or :
- Paint over them with orange. I have alternated both methods.
- Make a final check on the values and details. FINISHED!


