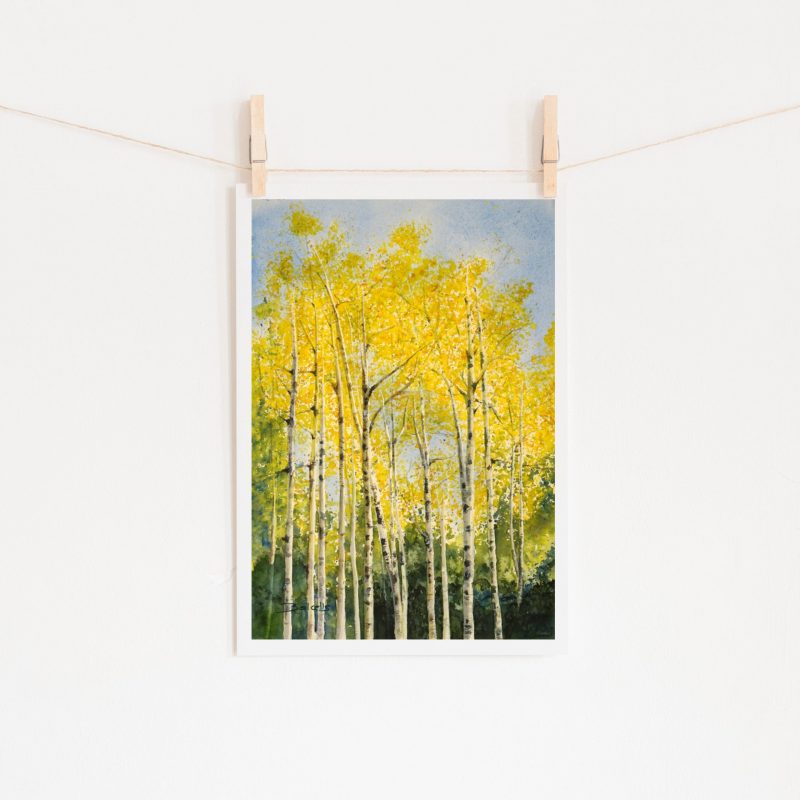
I painted this picture inspired by a photo by Rosemary Clark. I loved the colours and shapes of the image and also this nice golden yellow of the aspen trees leaves. “Aspen approaching the autumn” is the title, but I could have given to the painting “YELLOW QUARTET” because I have painted it with four yellows. Transparent Yellow, Yellow Ochre, Winsor Yellow, New Gamboge. My suggestion is you read my steps, and then you paint your version of it, which will make you much pleasure because it will deserve you a much higher degree of pleasure and will be “Your Work”.
TIPS: you can replace the spattering technique by sponging, and you may use other yellows, even light blues and greens.
Photo reference: Rosemary Clark (http://pmp-art.com/)
Let's get started
MATERIALS:
PAPER:
- Fabriano,300 grams Cold-pressed paper 46 x 61 cm
COLOURS:
- Transparent Yellow, Yellow Ochre, Winsor Yellow, New Camboge, Cobalt Blue, Perylene Violet, May Green or (Permanent Sap Green + Winsor yellow) Indigo, Sepia,
BRUSHES:
- No. 1, 2 and 6, round good pointed.
- Big Flat 55 mm to wet the paper and apply the first washes.
- No.12 synthetic hard flat brush to lift colour.
OTHER MATERIALS:
- Saral transfer paper and transparent paper.
- Masking fluid.
STEP 1:
- Copy and transfer the drawing onto your watercolour paper.

STEP 2:
- Protect the trunks of the trees with masking fluid and let it dry.
- Once the masking fluid is dry paint the sky with Cobalt Blue ad a pair of diagonal strokes in the middle of the paper, then quickly with the spray bottle soften all the edges with clean water. It is important not to get too big drops on the paper that would change the texture of the wash. If your paper gets too wet, take a tissue and lift some water carefully. Let it dry overnight.

STEP 3:
This step is done all in one go without stop. We will splatter the colours to get the colours blending into each other. This method allows the colours to blend into each other on a spontaneous way and gives to the scene a more natural feeling. Remember that high pictures use to create tension, to soften this a little, we soften the hard edges with a spray and water as if the fog would kiss the paper.
- Fill a brush No.10 with Transparent Yellow and start splattering all the white spaces; try to get small spots of water. Keep on spattering until all the big white spaces are covered with 50% of yellow spots. Now use the spray and spray 40 cm of the painting to get the paper a little moist but not wet. It will help your yellow spots to keep on wet some minutes longer.
- Fill your brush now with Winsor Yellow and continue splattering on the same way as before over the remaining white spaces. Some drops of darker yellow with fall over the light transparent yellow and let them melt. Do now move the paper and continue splattering and keep the paper always lightly moist with your water spray as if it would give it a touch of perfume. Fill now your brush with New Camboge and repeat as on the step before. At this point, you will observe that some drops are getting more prominent than the others. If you have too big drops, lift a little of the colour with the edge of a tissue or kitchen paper.
- Now, fill your brush with a light Cobalt Blue and splatter some colour around the yellow foliage on the upper side, then do the same on the lower part of the painting. On this part of the picture, you will continue with blue and while wet spatter on it some yellows again. Take a little distance and observe if the colours suggest on their shapes some plants or low trees.
- Fill the brush with Permanent Sap green or Indigo and suggest some pines among the greens. Keep the paper flat and spatter some more yellow if necessary. Do not forget to keep your upper side of the painting moist during this time.
- Finally, fill your brush with Yellow Ochre and spatter over the upper foliage again. At this point, you may also use a sponge carefully.

STEP 4:
- Remove the masking fluid carefully, especially if you dried the paper with a hairdryer, and erase the pencil lines if some still visible.
- With the flat brush and clean water soften the edges of the left side of the tree trunks and allow a little of the colour of the left side of the tree to cover the tree trunk space but not all. The right side is the sun side and has to be kept white. Let it dry.

STEP 5:
- Mix now in your palette Cobalt Blue with Perylene Violet and add a small touch of Yellow Ochre to it so that you get a warm grey colour.
- Paint the shadow side of the tree trunks with a light glaze. Try to alternate the colour tone. Use stronger tones in the foreground trees and a lighter on the more distant or smaller trees.

STEP 6:
On this last step, you must follow your intuition more than my painting. See the technique I used, do not look more to this demo and try a similar scene on your own.
- First mix in your palette some dark greys as before. Add some Indigo, Cobalt Blue and Sepia if necessary.
- Paint now with the side of the brush the dark lines of the tree trunks. Allow your brush to make some irregular drops.
- Paint the end of the branches with a thinner brush if you haven’t done it before.
- Add to the beginning of the branches, some darker values on their shadow sides.
- Add some irregular spots here and there along the trunks of the trees with the same colours and add in their centre a drop of another colour as well.
- Make a revision of the greens in the foreground and add or remove some if necessary. Follow your intuition here again.
- Finally, splatter over the upper part some Yellow Ochre and taper over the wet colour spots with your fingers to get irregular shapes.
- Allow all to dry.

STEP 7:
- In this last step, we revise all the points. Spatter some light green (May Green) on the foliage if you find it too yellow. Add Yellow Ochre or New Gamboge if you feel it has to be a bit darker. Soften some edges with the flat brush of the tree trunks if they still being too sharp. Use white gouache also if necessary to lighten some parts of the tree trunks if they went too dark, but carefully and finally revise the green of the foreground again and suggest some darker plants with Perylene Green. Here again, do not try to compare paintings. Look at your picture and decide when it is ready. Usually, it is ready when you think.” I could add here or there is a little of, but it is also OK as it is”. At this point, your picture is finished!
